The C major guitar scale will teach you many of the most basic, and crucial, concepts of not only the guitar but of all music.
Many of the most basic guitar chords like G, Am, and Em come from this scale, and the sound of this musical key has more than likely formed the soundtrack of at least a part of your life.
This scale is one of the most common key signatures used in music.
Its key signature has no flats and no sharps; its relative minor is A minor, and its parallel minor is C minor.
Some examples of songs written in the key of C Major are “Imagine” by John Lennon and “House of the Rising Sun” by The Animals.
Table of Contents
Notes in the C Major scale
The sound of the C major scale and the notes therein suggest to many people the qualities of innocence and happiness free from the knowledge of the world as it really is.
The notes in the C major scale are: C D E F G A B
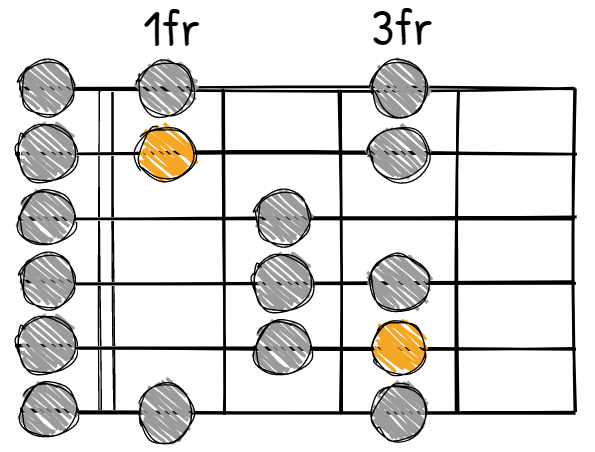
If you want to play these notes in this exact order, you can use your guitar’s 2nd string (B string) to easily find them all one after the other:

Playing this scale is going to put you in a good mood, however, why do we say this and how do these notes actually do that?
You see, every major scale is going to be composed of a specific formula of whole steps and half steps.
With major scales, that formula will look like this:
- C Major Scale = C (W) D (W) E (H) F (W) G (W) A (W) B (H)
Intervals of the C major scale
An interval in music is defined as a distance in pitch between any two notes.
The intervals of the C major scale are:
- Tonic: C
- Major 2nd: D
- Major 3rd: E
- Perfect 4th: F
- Perfect 5th: G
- Major 6th: A
- Major 7th: B
- Perfect 8th: C
In the formula that we saw in the previous section, the parentheses were the distance between the notes of the major scale, which would be:
whole, whole, half, whole, whole, whole, half
The term “whole” means a whole tone, and “half” means one semitone.
In guitar terms, we can understand this better by relating the concept of a “whole-tone” distance to being equal to 2 frets, and a semitone to being the same as 1 fret.
This means that every fret on your guitar is a half step apart!
Intervals are also named by size and quality, and they are many different ways that you can measure the intervals of a scale, for example, in half-steps, semitones, or frets.
The possible qualities are major, minor, perfect, diminished, and augmented.
Years and years of music theory knowledge out there unfortunately also brings just as many confusing and different terms for similar concepts.
As long as you learn that an interval is just the gap between two different notes and that there are many ways of referring to them, you should be on the right track for now.
Relative Minor Of The C Major Scale
The relative minor scale of the C major scale is the A minor scale; its parallel minor scale is the C minor scale.
In other words, the notes in the C major scale are the same as in the A minor scale but instead, the A minor scale uses the A note as its starting point (A B C D E F G).
This concept can be easily explained and illustrated through the Circle Of Fifths:
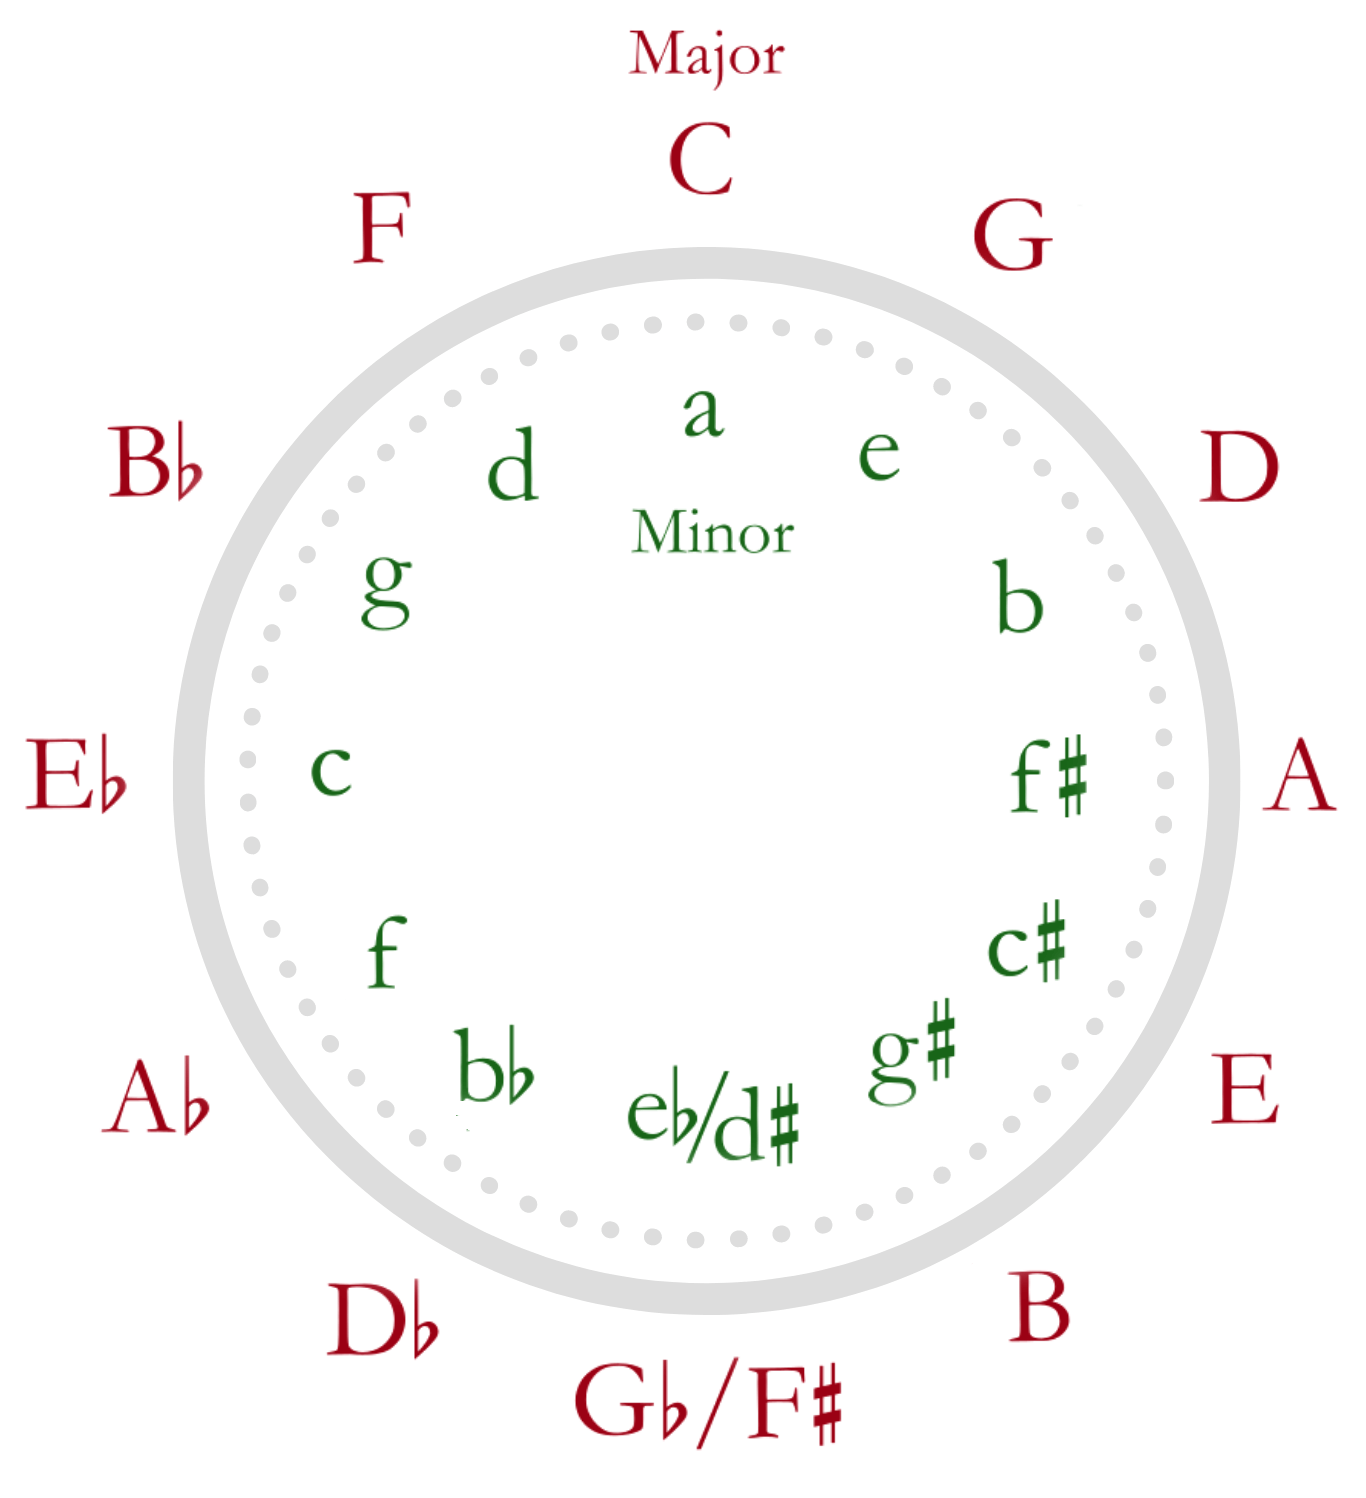
The Circle Of Fifths is a way of organizing the 12 chromatic pitches as a sequence of perfect fifths.
Now, the defining difference between the C major and A minor scales is that the tonal center of the C major scale is C and the tonal center of the A minor scale is A.
To put it another way, chords and melodies will manage to return and rest on the C note when we’re playing the C major scale, but in A minor they will settle on the A notes.
Relative keys are the major and minor scales that have the same key signatures but are arranged in a different order.
Two major and minor guitar scales that share the same notes are said to be in a relative relationship.
Most songs created using the C major scale tend to sound happy, positive, upbeat, and somewhat cheerful, whereas songs created using the A minor scale sound more deep, serious, and sad.
C Major Scale Guitar Fretboard Positions
In standard tuning, the C major guitar scale can be played at many different fretboard positions.
Look at the guitar fretboard screenshot below to see what I’m talking about:

You’ll notice that notes repeat themselves all over the fretboard, meaning that what you can play at fret 1, 2nd string, can also be played at fret 3, 5th string, fret 5, 3rd string, and so on.
There are many different scale systems that you can use to play the C major guitar scale, the 3 most popular ones are:
- 7 Position Scale System
- 3 Notes Per String Scale System
- The CAGED Scale System
Each one of them has its own advantages and disadvantages, for example, the CAGED scale system is the better option for beginners as it doesn’t require a lot of finger stretching.
On the other hand, the ‘3 Notes Per String’ and the ‘7 Position Scale’ systems can be useful in many cases as they let you stay in one position for longer times while moving quickly around the fretboard.
Think about scale systems as just different patterns of playing notes on a certain scale in different ways.
Personally, I love the CAGED system because it’s practical for learning chord shapes, arpeggios, and scales up and down the neck of the guitar while emphasizing the relationship between these concepts.
Notice that the notes of the C major guitar scale that we showed in the fretboard screenshot above, overlap with the notes of the C major chord in all of its many chord shapes.
Take a look at all the possible C major chords that you can play up and down the guitar fretboard:
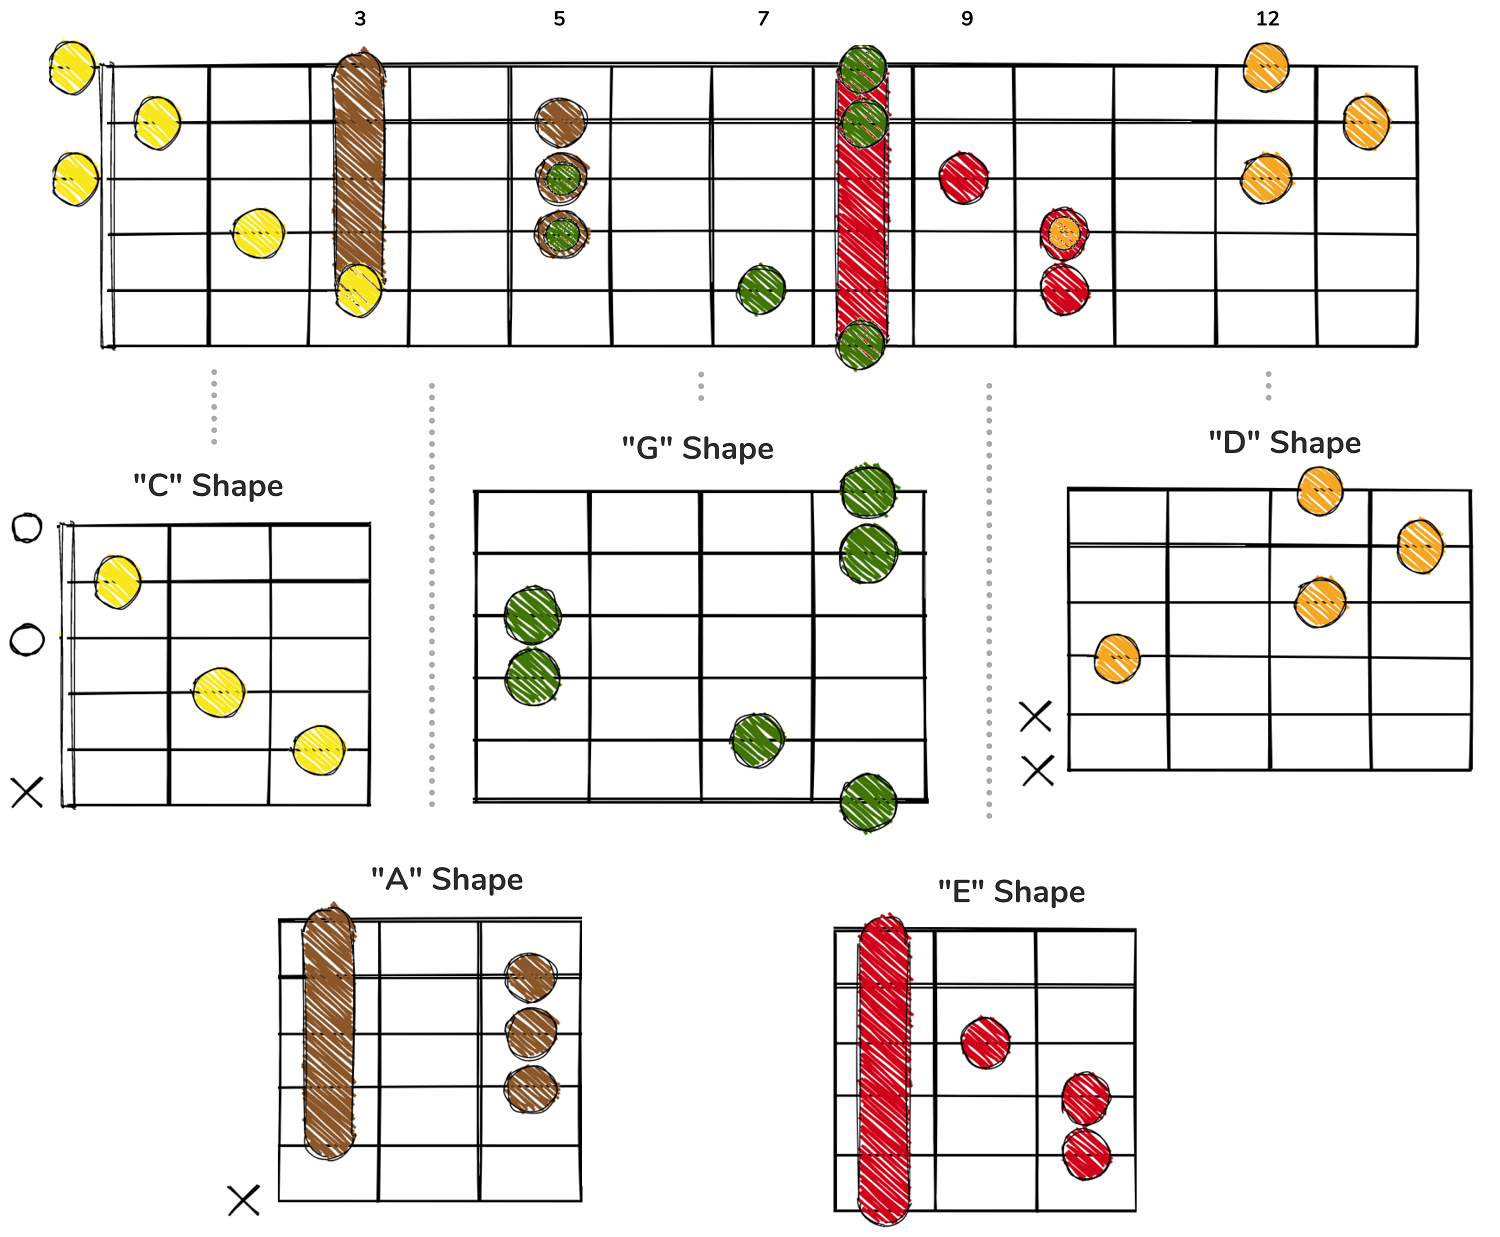
CAGED patterns are based on the open chord shapes of C, A, G, E, and D chords.
To put it another way, these are moveable scale shapes that you can use to play any other major scale by simply playing the same scale pattern starting from a different root note.
If you learn how to play all these chord shapes and master a certain scale, then you pretty much will know all of the other major scales as well.
The more you can see chords and scales together, the better you’ll get at remembering solos and chords, and improvising in any key.
Position 1: CAGED “E” Shape
The first position that we’ll learn is the “E” shape, which you can easily locate by finding the C scale root note on the 6th string of your guitar.
In this case, that will be on the 8th fret although this position starts on the 7th fret; it would look something like this:
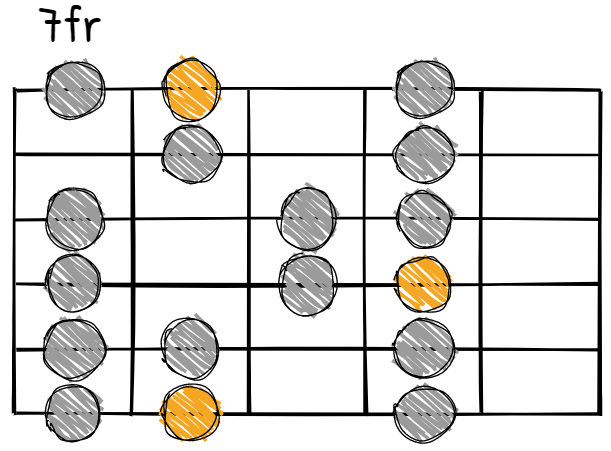
Now, for any scale, you’d generally want to start from the lowest root note, and then play up to the highest note available, which doesn’t have to necessarily be a root note.
After we do so, we’d play down to the lowest note available, which again doesn’t have to necessarily be a root note.
Lastly, we’d play our way back to the starting root note, if the lowest note in the diagram is not the root note.
Putting it into a tablature will give you something like this:

If you’re just beginning to learn how to play scales, just like I always recommend, play this as slow as possible and work on your accuracy rather than speed.
As you feel more comfortable, then start to speed up; using a metronome would be ideal.
Position 2: CAGED “D” Shape
For the second position, we’ll be playing the “D” shape pattern.
To find this pattern on your guitar fretboard, you can look for the C scale root note on the 4th string of your guitar.
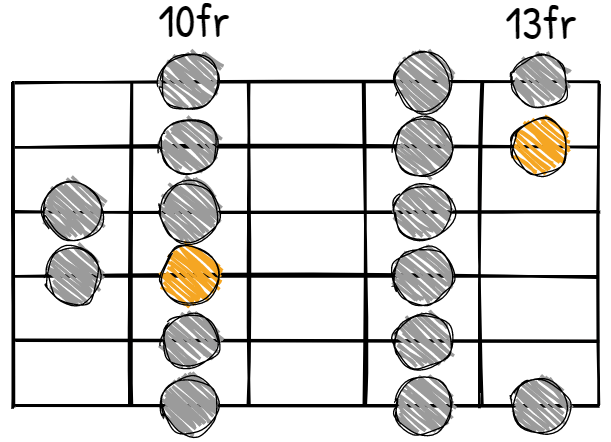
The same ideas are happening here, the shape closely follows a D open chord shape, even though it’s still a C major chord.
In tablature form this would give us something that looks like this:

Just like in the previous position, we’re going to start from the lowest root note, and then play up to the highest note available.
For this case that would be on the 10th fret 4th string, up until the 13th fret 1st string, which again is also not a root note and it doesn’t really have to be.
Once we reach the last note, we’d start to go back to the lowest note available, which for this position is on the 10th fret 6th string.
After that, we’d play our way back to the starting root note if the lowest note in the position is not the root note, which if it is, we would be done right there.
Position 3: CAGED “C” Shape
We’ll now finally get to see the “C” shape pattern, which in this case, it would be pattern 3.
In this case, this pattern can also be referred to as the “open position,” which means that it includes one or more notes that are not fingered and have to be played on open strings.
If it’s confusing why the CAGED “C” shape is referred to as position 3 instead of position 1 (since the “C” is the first letter in “CAGED”) is because we generally number scale patterns based on which one has the lowest root notes.
In other words, out of all the patterns in a particular scale, the one that has a root note on the 6th string or the lowest root note of all, will be pattern 1.
Now, this scale would give us something like this in tablature form:

If you take a closer look, this fits very nicely under your fret hand too, so if you’re a beginner and feel pain when stretching your hand too much, then I’d recommend starting with and learning this shape first.
Position 4: CAGED “A” Shape
The CAGED “A” shape position is the most difficult one because it spans 6 frets.
Not only that, but it plays 3 consecutive notes that are 1 whole step apart from each other, that is on the 6th string:
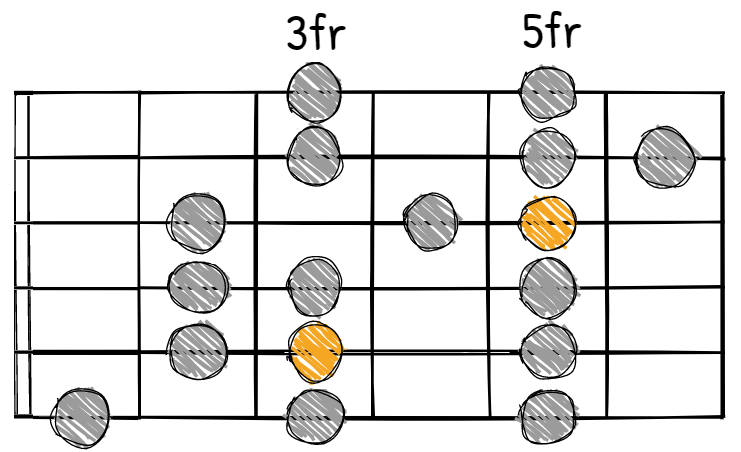
Now, this shape is also the only one out of all that people tend to play differently every time.
Some guitarists take out the note on the 1st fret 6th string and replace it with a new one at the end of the scale pattern on the 7th fret 1st string.
On the other hand, some others don’t play these notes at all and simply start the pattern on the 3rd fret 6th string of your guitar.
In tabs, following all the same principles we outlined before, we’d play something like this:

If you choose to play the 3 consecutive notes that are 1 whole step apart from each other and you’re not as comfortable doing so, then once again make sure that you play as slow as possible.
Focus on accuracy and with time and patience, start building up your speed whenever you feel like you naturally have to.
Position 5: CAGED “G” Shape
The last position that we’ll play is going to be the “G” shape pattern.
Out of all shapes, this one, along with position 1, has more than 3 root notes:
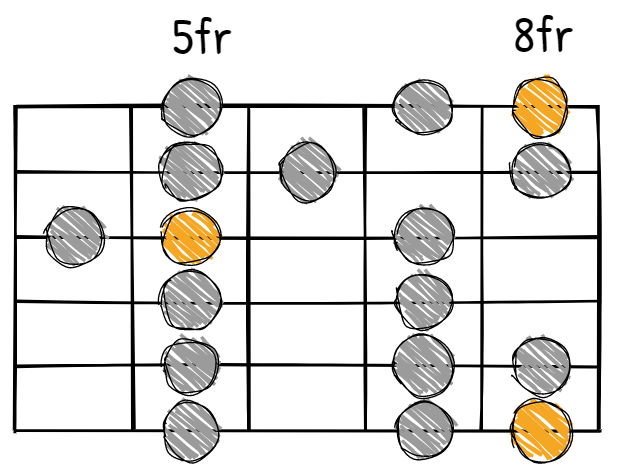
For those of you looking to improvise solos and be able to create your own riffs from these scales, having a lot of root notes to put emphasis on is a wonderful thing.
It allows you to find a lot more patterns and licks that you can later memorize and play.
Putting this scale into tabs form, we’d have something like this:

Chords in the C Major Scale
In this section, we’re going to show you the 7 chords that come from the C major guitar scale.
With the 7 notes (C D E F G A B) of the scale, you can get a group of chords built from those same notes.
The 7 chords in the C major scale are:
- I – C major (C)
- ii – D minor (Dm)
- iii – E minor (Em)
- IV – F major (F)
- V – G major (G)
- vi – A minor (Am)
- vii° – B diminished (Bdim)
The first 6 chords are used all the time in many popular songs we hear every day.
Now, you may be thinking, “How are these chords in specific related to the D major scale?”
This is a great point and many articles that you’ll find online on this topic fail to explain in simple terms.
Take a look at the table below summarizing the chords in the C major scale and their notes:
| Chord | C | Dm | Em | F | G | Am | Bdim |
|---|---|---|---|---|---|---|---|
| Notes | C-E-G | D-F-A | E-G-B | F-A-C | G-B-D | A-C-E | B-D-F |
These notes are not random, they are triads, meaning a given note with the third and fifth above it.
So for example, taking the 7 original notes of the C major scale, C D E F G A B, if we wanted to assemble our first chord, we’d do the following…
Take the first note (C) in the scale and look for its 3rd (two notes up) and its 5th on the scale (moving up another 2 notes up from the third).
That gives us C, E, and G, also known as the C major chord (C – D – E – F – B – A – B).
For the second, third, and all the other chords, it’ll end up giving you something like this:
- D minor chord: C – D – E – F – G – A – B
- E minor chord: C – D – E – F – G – A – B
- F major chord: C – D – E – F – G – A – B
- G major chord: C – D – E – F – G – A – B
- A minor chord: C – D – E – F – G – A – B
- B# diminished: C – D – E – F – G – A – B
Once again, if you’re barely learning about scales I don’t recommend you going all in trying to understand this, but just know that there are reasons why some chords are in one key and some others aren’t.
Now, let’s actually dive right into each one of them in more detail!
C Major Chord
We’ll start with C major (I) and its several chord shapes up and down the neck:
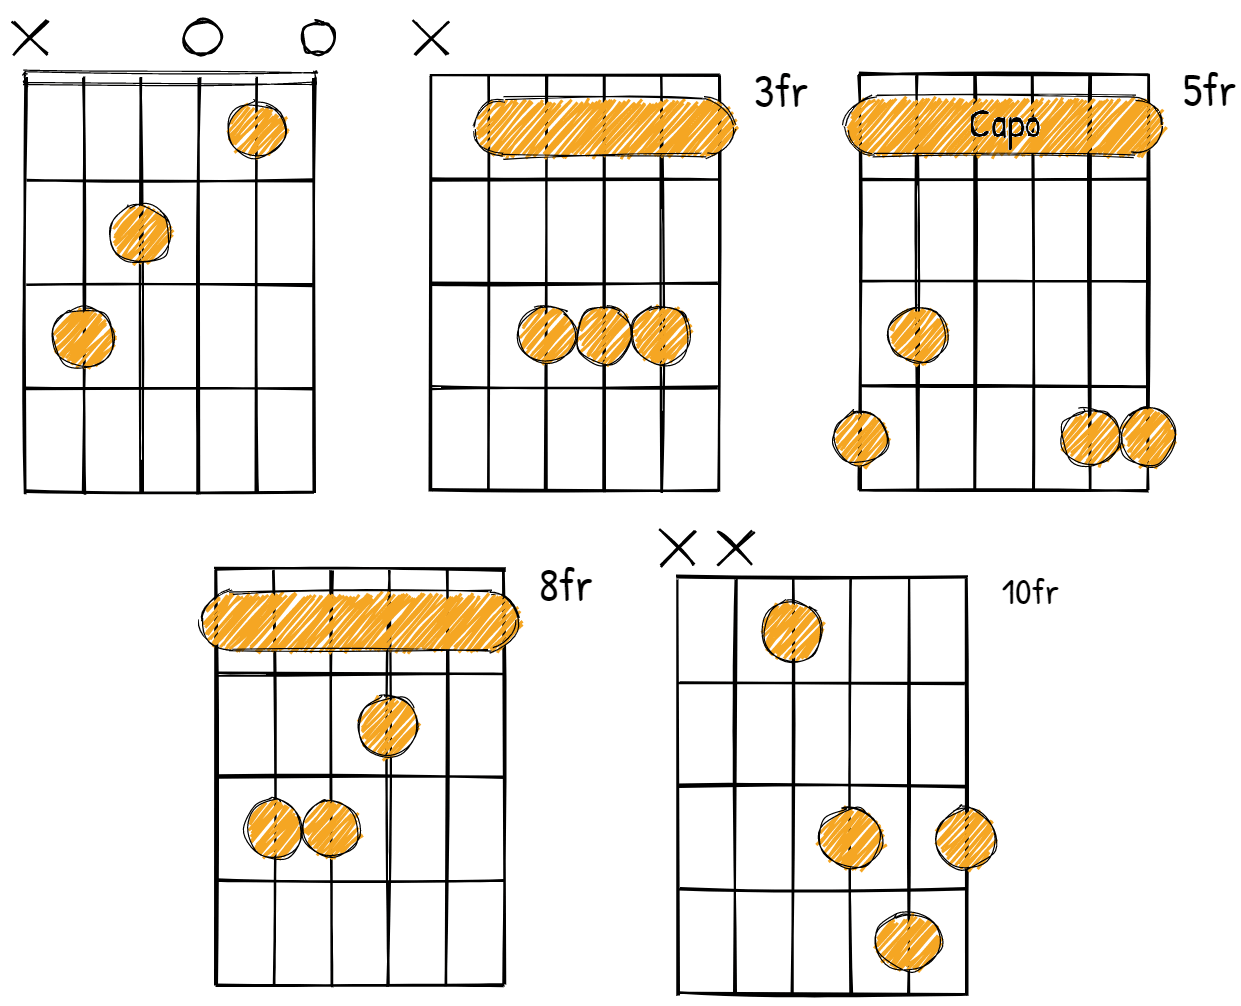
And for those of you that might be more comfortable with tabs:

The first chord should be obvious if you’ve been playing guitar for a few months, as well as the others.
What’s important to note in the context of this whole article is the relationship of the scales to these chords.
Go back to the last section and you’ll see how the scales we talked about match perfectly with these chords.
This may be obvious to lots of people, but it can be a powerful a-ha moment if you’ve struggled to make sense of music theory before.
D Minor Chord
Let’s go over some more chords in the C Major scale, starting with the Dm (ii) chord:
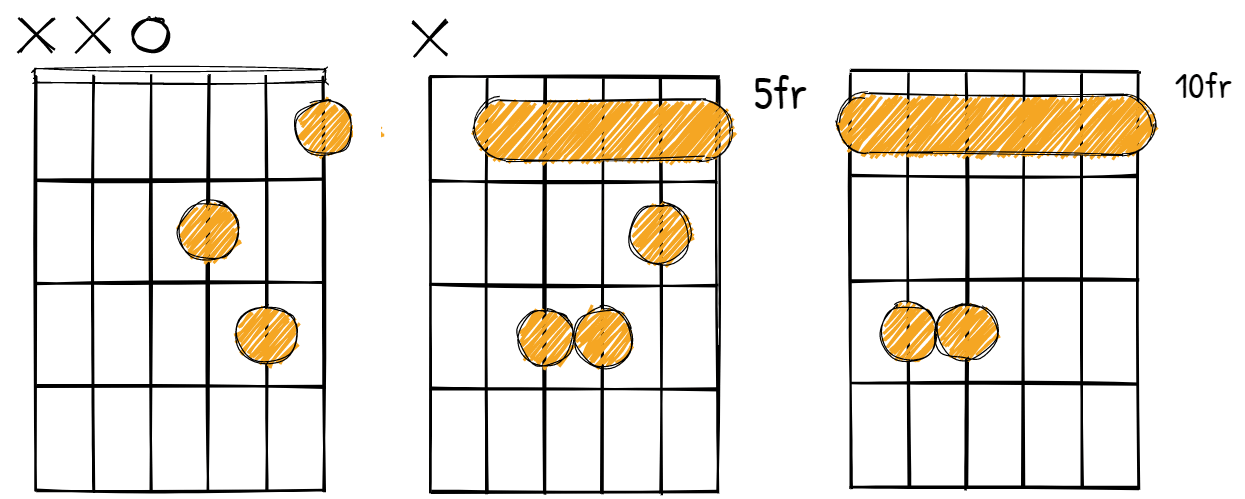
And here is the tabs of each one of these chord shapes side by side:

The first chord is a basic open chord you may have learned already, but the other two shapes of Dm are very important to learn as well.
You’ll see these used in lots of other harmonies besides Dm because the whole fretboard is organized by such shapes.
E Minor Chord
Take a look at these Em (iii) chord diagrams across the guitar fretboard:
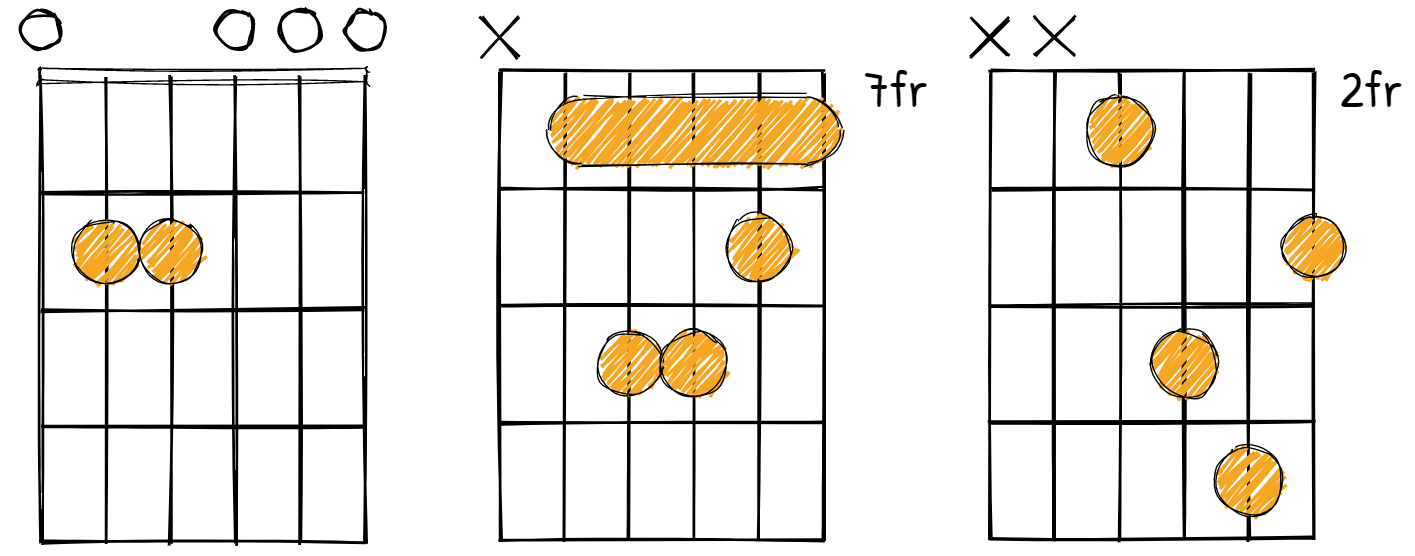
Although there are many other shapes aside from these 3, these are among the most used ones.
It’s the same chord, but in different positions along the guitar fretboard!

However, you may be wondering how these shapes are part of the C major scale.
It goes back to the formula we talked about at the beginning of this article and the set of notes we get from it.
Let’s break down the notes of Dm, Em, and Am so you can see this more clearly:
- C major scale notes: C – D – E – F – G – A – B
- Dm: D – F – A
- Em: E – G – B
- Am: A – C – E
Can you now see how chords and scales work so closely together?
Each note that is part of the chord is also part of the C major scale notes, they overlap each other.
If you’re a lead guitar player, you should now start to have an idea of how you can potentially use the C major scale to play out solos while the sound of these chords or similar ones is being played.
F Major Chord
Now let’s move to the next chord that comes from the C major guitar scale, in this case, the F major chord:
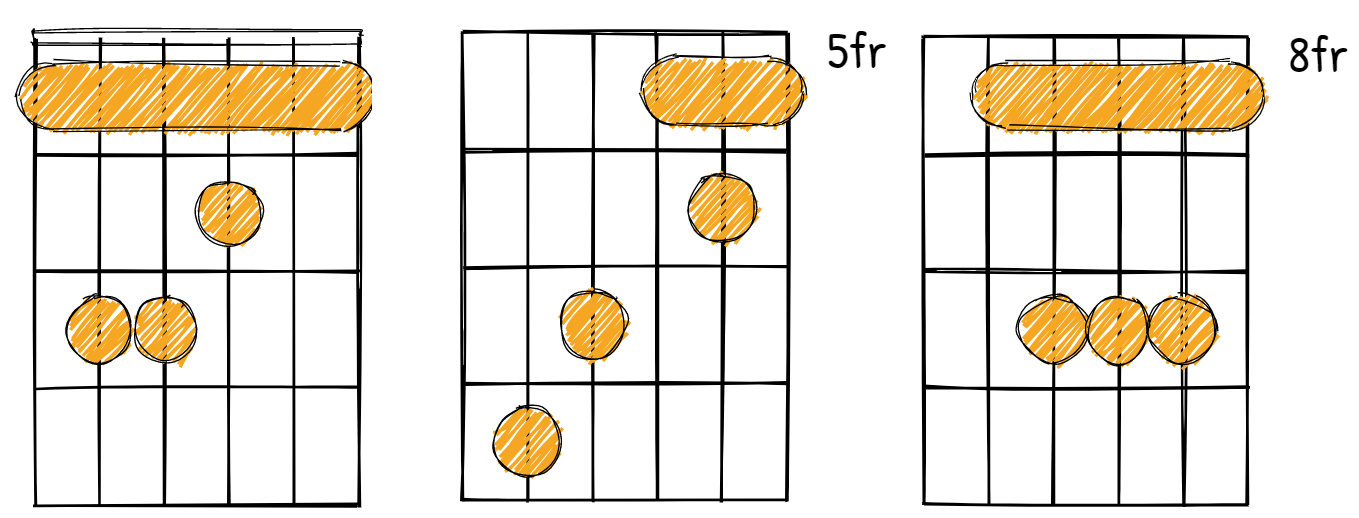
The first and third diagrams are the most common F major chord shapes that you’ll encounter as a guitar player.
When it comes to the second one, although people use it less frequently, it’s still a popular version that advanced guitar players utilize when making chord transitions and progressions.
Here are the same 3 chord shapes in tablature form:

If you’re a beginner, I would discourage you from learning the second shape until you feel more comfortable and gain more experience as a guitarist.
G Major Chord
The next chord that we’ll talk about is the G major chord (V), here are 4 different shapes that you can play across the guitar fretboard:

In tablature form, these 4 chords would look something like this:

If you take a closer look, you’ll realize that most of these chord shapes are very similar to the ones we showed for F major.
Depending on where in the fretboard you’re playing, or which chord will go after the current one, you will find yourself using different versions of the same chord.
This is very helpful and allows you to add a lot of dynamics to your songs.
For example, you might play only open chords for the chorus section of a track, but just play barre chords for the verse.
A Minor Chord
Let’s now take a look at some A minor (vi) chord diagrams:
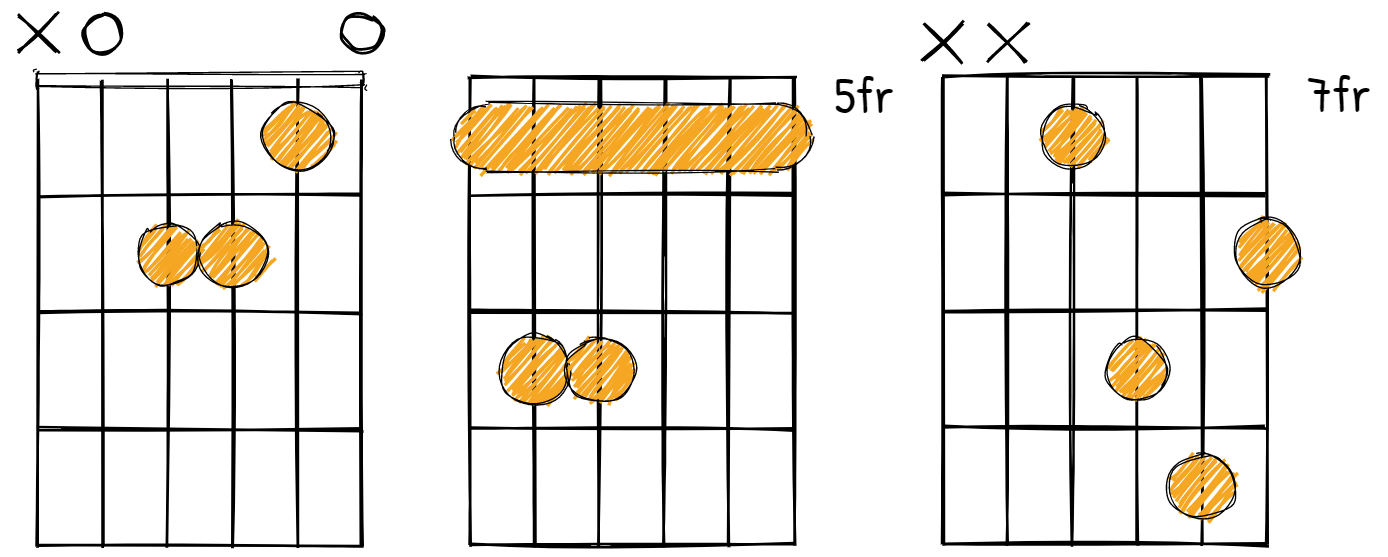
These chord shapes are generally the first chords we learn as beginners, particularly the first one.
One of the most popular 2-chord progressions ever is C-Am (I-vi).
When we’re starting to learn to play the guitar, this progression is one of the easiest ones to memorize since all we do is move our ring finger from the 3rd fret 5th string to the 2nd fret 3rd string.
In tablature form, these A minor chords variations can be represented like this:

Once again, knowing the different chord shapes across the fretboard is very practical when memorizing the actual scales as it allows you to see and understand the theory behind them.
B Diminished Chord
Lastly, we’re going to take a look at some B diminished chord variations (vii°), here are 3 of the many different shapes that you play:
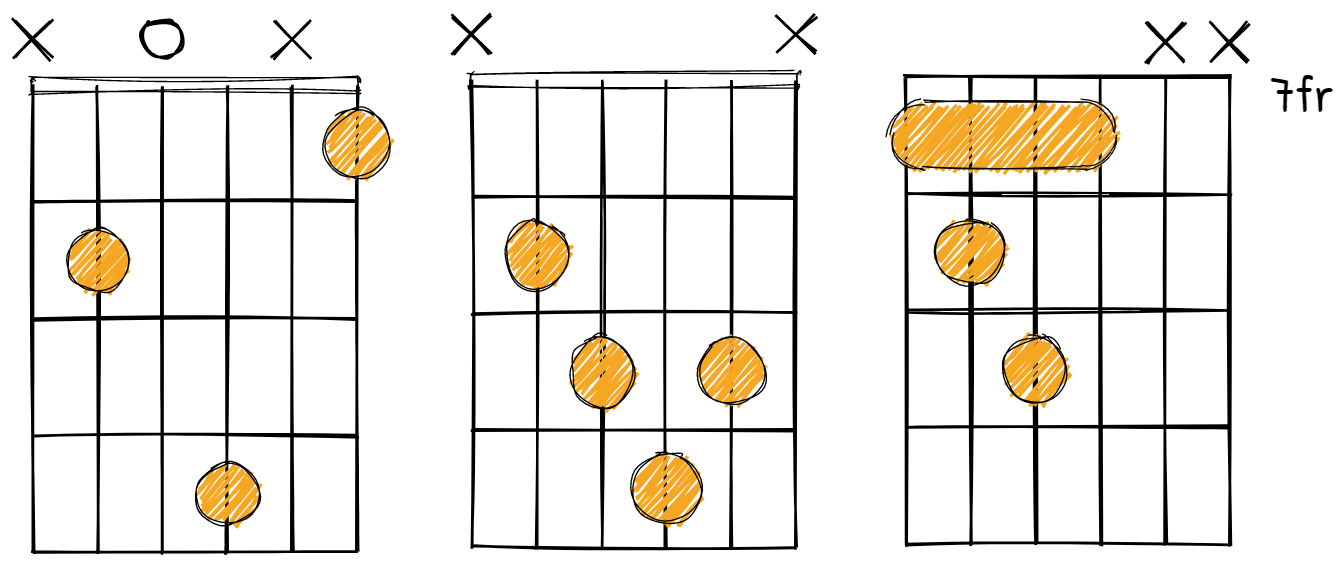
The first shape, although it might look simple, is in my opinion one of the hardest ways to play this chord if you’re a beginner.
I always opt for the 2nd and 3rd chord shapes since we don’t need to place our index fingers on the first string and therefore our hand feels less tense.
In tablature form, these B diminished chord variations can be illustrated like this:

Make sure you pay attention to whenever a string doesn’t have to be played, that is an X for diagrams and an empty string for tabs.
This is very important to make sure you’re not playing notes outside of the C major scale.
Let’s go over some exercises that will help you further integrate these concepts into your mind and learn to play these scales and chords effortlessly.
Guitar Exercises In the C Major Scale
The first two exercises are going to help you remember where all of these chords appear on the fretboard.
We created these so that you’ll see the shapes all over the fretboard as you’re playing the scales by themselves or with some backing track.
Exercise 1
The more chord shapes you learn, the easier the time you’ll have creating melodies and guitar licks afterward.
Our first exercise will introduce a lot of the chords in the C major scale, not necessarily making a lot of sense to a listener’s ear, but these will start making chord changes easier for you.

Exercise 2
Even though both exercises 1 and 2 have almost the same chords with different progressions, not all chords are being played in the same positions.
Nevertheless, playing these progressions will inevitably open the door to start discovering your own favorite progressions, and the more you play, the easier it will be to come up with your own original ideas.

On the other hand, you’ll have to play some barre chords followed by open chords, and vice versa.
For low-experienced players, working on this alone will make a huge difference in how much progress they make in their overall mastering of the guitar.
Exercise 3
The next exercise is going to have you play the C major scale along with different patterns.
We often just focus on playing scales right from a diagram and ignore all the musical information contained therein and how to use it in actual real scenarios.
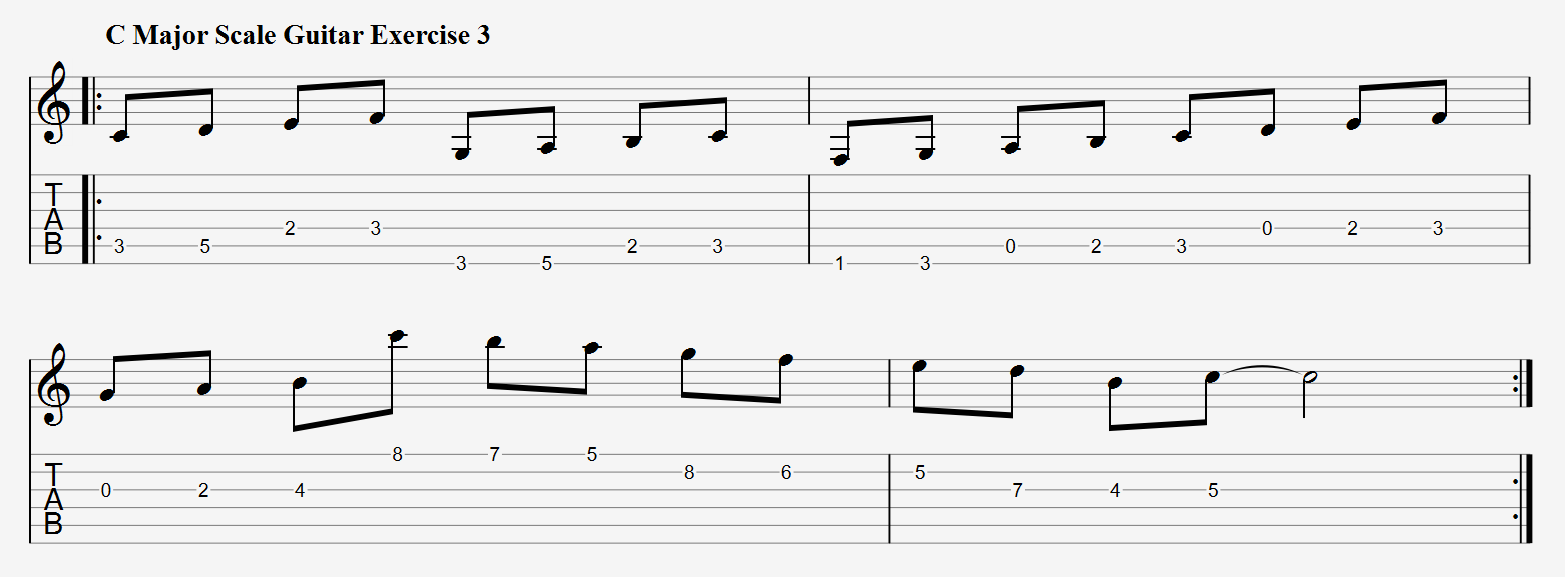
I encourage you to play these as slow as you can with the help of a metronome and start building your speed up as you begin to feel more comfortable.
Also, feel free to play around with it by maybe staying on a certain note for a longer period of time, by looping a specific pattern over and over, or by simply playing chords in the C major scale.
Exercise 4
The next exercise is going to have you use the C major scale starting on different notes of the scale to begin testing your accuracy.
A lot of lead guitar playing is going to involve using the information in chords and scales to make licks and melodies.
When it comes to exercise number 4, I advise you to also play it very slowly with the help of a metronome and start speeding up once you naturally feel like you have to.
Try starting at 60-70 bpm, and increase your speed by 5bpm each time.

Being able to do this fast and accurately will help when playing live improvisations or when you can’t think of the right notes immediately.
Remember that these exercises are not only here to help you improve your playing, but also to help you see new connections between these musical concepts and increase your knowledge of guitar scales.
Here’s a great backing track in the key of C major that you can use to have some fun and practice these exercises and scales:
This video will show you the chords that the rhythm guitar is playing for both the verse and chorus of the song and will also provide you with the C major scale notes across the entire fretboard.
You can use this information to alternate between rhythm and lead guitar and start learning to improvise quickly and accurately.
Chord Progressions In The C Major Scale
Now that you have all the info behind why chords like these so often appear together, it’s time to talk about chord progressions in the C major scale.
We now finally get to talk about real live music for a change, instead of theoretical concepts!
The C major guitar scale is the foundation and base for all of these chords.
C – G – A – F – C – G – F – C
Our first example will be a very beginner-friendly version of “Let It Be” by The Beatles.
Depending on which level you’re currently at in your learning journey, you’re going to play it either at normal speed or very slow.

I encourage you to first try to play each of the chords by yourself and then search up the original song so that you can play along if you’re able to.
There’s is a part in this progression that two or more chords are played faster than the others, and that is the F major chord with the last instance of the C major chord.
If you have trouble getting that part right, I encourage you to watch this tutorial by Marty Music:
C5 – G5 – F5 – C5
Now, to hear the C major key in a different context, let’s play the following chords from Blink 182’s “All The Small Things.”
This chord progression comes from the verse section:

As you can see, these chords have a “5” at the end, but what does even mean?
That means that we’ll be playing fifth chords or power chords for this example.
A power chord is an informal way of referring to a certain chord in guitar music, particularly when playing electric guitars, that consists of the root note and the fifth, as well as possibly octaves of those notes.
Lots of punk musicians use the I, IV, and V chords for many of its most famous progressions, and this one is no exception.
Here’s a great tutorial video that you can watch by GuitarLessons365Song if you want to learn to play this song:
C – C – Dm – C
Now going into 80s pop territory, let’s look at “Wake Me Up Before You Go-Go” by Wham!
This chord progression only uses two chords for the chorus, which are the I and the ii chords.

Just like in the previous examples, this is just a very simplified version of the original song.
If you’re looking to learn the advanced way of playing it, then this YouTube video will help you achieve that:
C – G/B – Am – F – C – F – C – G
The final chord progression we’ll go over is Bob Marley’s “No Woman No Cry.”
This one is very similar to “Let It Be” by The Beatles as it has two chords per bar of music and uses many of the same chord shapes.
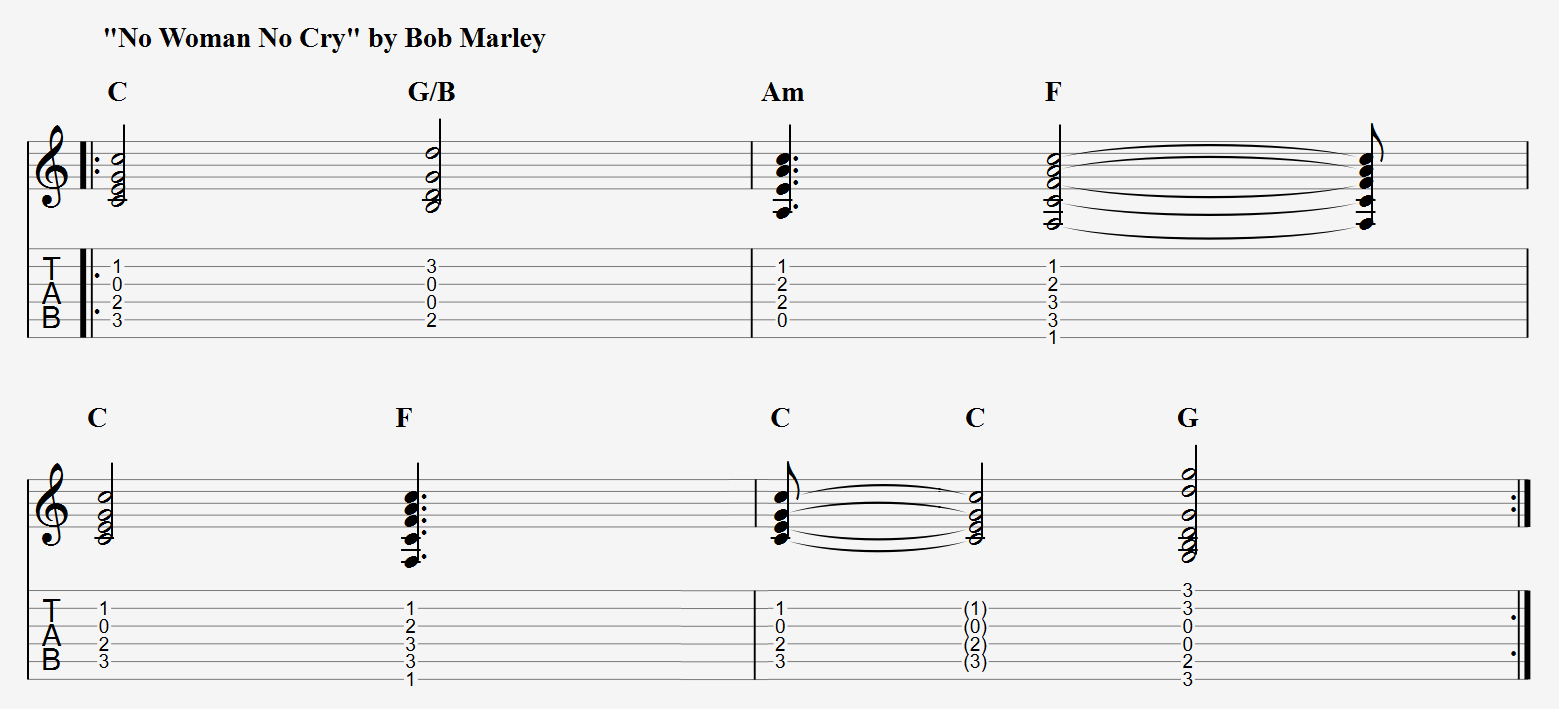
For this simplified version, playing the last G major chord might feel a little bit off from the original track.
That’s because instead of playing the entire G major chord, we should play a small transition that starts with the G note in the 3rd fret of the 6th string and ends in a C major chord in the next bar.
If you’d love to play the advanced version of this amazing song, then this YouTube video by Swiftlessons will be of great help:
As you can see, there are many songs written in the key of C major.
Since these chords are not necessarily difficult to learn and memorize, they’re usually very used by both beginners and advanced players whenever they’re writing new music.
Other songs that were written using the C major scale are:
- “The Pretender” by Foo Fighters
- “Stairway to Heaven” by Led Zeppelin
- “Californication” by Red Hot Chili Peppers
- “Bad Romance” by Lady Gaga
- “Hurt” by Johnny Cash
- “Piano Man” by Billy Joel
- “Miss You” by The Rolling Stones
- “When I Was Your Man” by Bruno Mars
- “Losing My Religion” by R.E.M.
- “Dreams” by Fleetwood Mac

Dad, husband, son, and guitarist. I’ve been playing guitar for 20 years. Passion for writing, painting, and photography. I love exploring nature, and spending time with my family. Currently have a Gretsch G5220 Electric Guitar as my main instrument.

